前期准备工作,需要用到以下安装包:
1、JDK
2、Eclipse
3、Android SDK
4、ADT Plugin for Eclipse
JDK、Eclipse、AndroidSDK网盘Skydrive下载链接
版本
Java(TM) Platform SE 7 U5 jdk-7u5-windows-i586.exe
eclipse-SDK-4.2-win32.zip
Android android sdk-installer_r20.0.1-windows.exe
Android SDK包含了开发工具,不过基本都是字符界面的,Eclipse集成开发环境提供了很好的图形化开发界面,对Android SDK有很好的支持,现在一般都使用Eclipse作为Android的开发平台。
使用Eclipse开发Android的应用程序,需要下载Android的Eclipse插件(ADT)才可以把Android SDK集成到Eclipse的开发环境中。
备注:
Android推荐使用"EclipseClassic"作为开发平台。
本文中所使用的安装文件均为编写文档时最新版本,发布后续版本,请自行下载更新。
----------------------------------------------------------------------------------------------------------------------------------------------------------------------------------
下面开始安装包,步骤如下:
步骤一:安装JDK
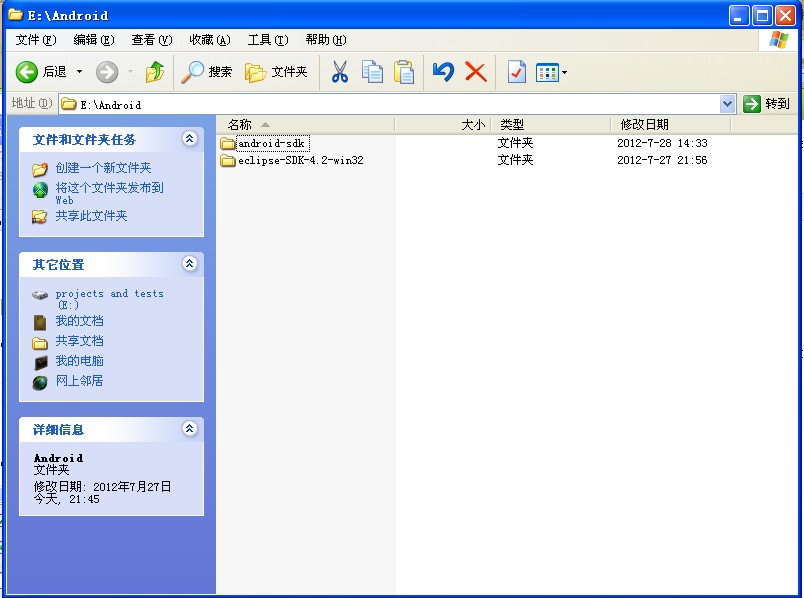
步骤二:分别解压缩Eclipse-SDK和Android-SDK到E:\Android路径下(路径自己配置)
Android Sdk安装时出现如下界面,如果没有,在sdk文件夹下运行SDK Manager.exe
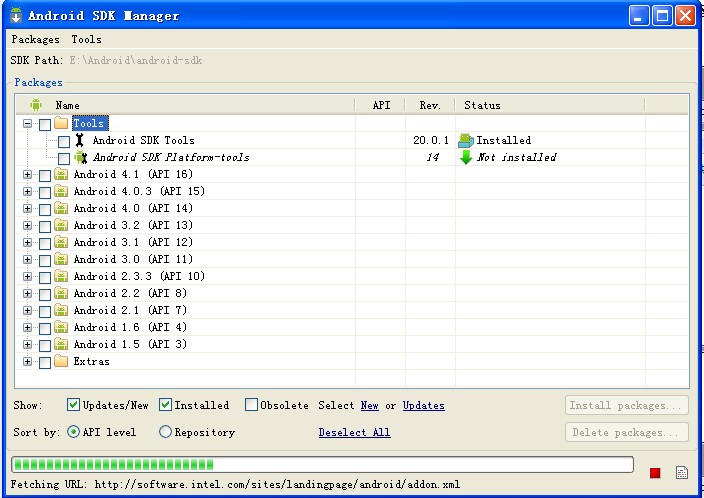
罗列出没有安装的工具包。如下图,选择要安装包4.1,然后点击【Install n Package】。

在弹出的对话框中选择Accept all,接受全部安装

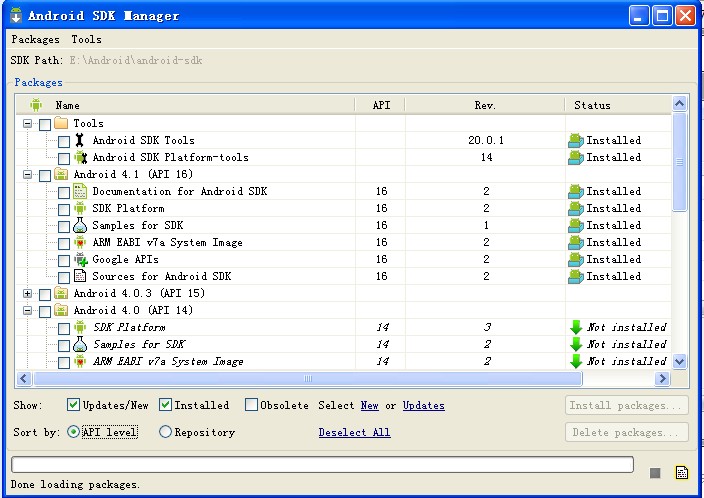
安装完成后如下图所示,左下角Done loading packages.
步骤三:在Eclipse中安装插件ADT
相见官网说明
http://developer.android.com/sdk/installing/installing-adt.html
Download the ADT Plugin
- Start Eclipse, then selectHelp>Install New Software....
- ClickAdd, in the top-right corner.
- In the Add Repository dialog that appears, enter "ADT Plugin" for theNameand the following URL for theLocation:
https://dl-ssl.google.com/android/eclipse/
- ClickOK
Note: If you have trouble acquiring the plugin, try using "http" in the Location URL, instead of "https" (https is preferred for security reasons).
- In the Available Software dialog, select the checkbox next to Developer Tools and clickNext.
- In the next window, you'll see a list of the tools to be downloaded. ClickNext.
- Read and accept the license agreements, then clickFinish.
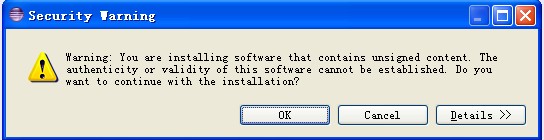
Note: If you get a security warning saying that the authenticity or validity of the software can't be established, clickOK.
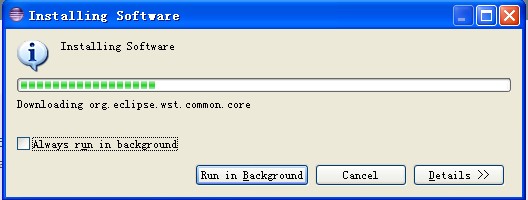
- When the installation completes, restart Eclipse.
Configure the ADT Plugin
After you've installed ADT and restarted Eclipse, you must specify the location of your Android SDK directory:
- SelectWindow>Preferences...to open the Preferences panel (on Mac OS X, selectEclipse>Preferences).
- SelectAndroidfrom the left panel.
You may see a dialog asking whether you want to send usage statistics to Google. If so, make your choice and clickProceed.
- For theSDK Locationin the main panel, clickBrowse...and locate your downloaded Android SDK directory (such as
android-sdk-windows).
- ClickApply, thenOK.
If you haven't encountered any errors, you're done setting up ADT and can continue to the next step of the SDK installation.
Updating the ADT Plugin
From time to time, a new revision of the ADT Plugin becomes available, with new features and bug fixes. Generally, when a new revision of ADT is available, you should update to it as soon as convenient.
In some cases, a new revision of ADT will have a dependency on a specific revision of the Android SDK Tools. If such dependencies exist, you will need to update the SDK Tools package of the SDK after installing
the new revision of ADT. To update the SDK Tools package, use the Android SDK Manager, as described inExploring the SDK.
To learn about new features of each ADT revision and also any dependencies on the SDK Tools, see the listings in theRevisionssection.
To determine the version currently installed, open the Eclipse Installed Software window usingHelp>Software Updatesand refer to the version listed for
"Android Development Tools".
Follow the steps below to check whether an update is available and, if so, to install it.
- SelectHelp>Check for Updates.
If there are no updates available, a dialog will say so and you're done.
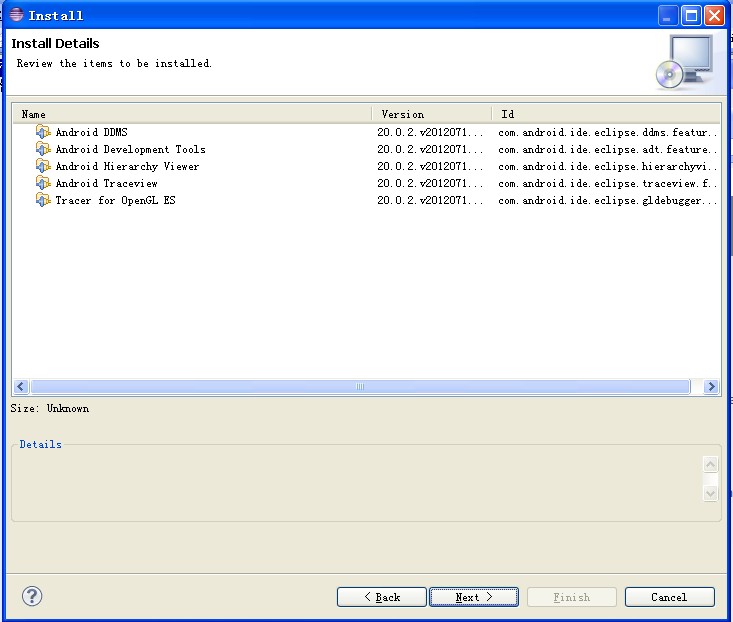
- If there are updates available, select Android DDMS, Android Development Tools, and Android Hierarchy Viewer, then clickNext.
- In the Update Details dialog, clickNext.
- Read and accept the license agreement and then clickFinish. This will download and install the latest version of Android DDMS and Android Development Tools.
- Restart Eclipse.
If you encounter problems during the update, remove the existing ADT plugin from Eclipse, then perform a fresh installation, using the instructions forInstalling
the ADT Plugin.
Troubleshooting
If you are having trouble downloading the ADT plugin after following the steps above, here are some suggestions:
If you are still unable to use Eclipse to download the ADT plugin as a remote update site, you can download the ADT zip file to your local machine and manually install it:
- Download the current ADT Plugin zip file from the table below (do not unpack it).
Name
Package
Size
MD5 Checksum
|
ADT 20.0.2 |
ADT-20.0.2.zip
|
12388464 bytes |
8e727bcdc9789c900784a82e6330ec22 |
- Follow steps 1 and 2 in thedefault install instructions(above).
- In the Add Site dialog, clickArchive.
- Browse and select the downloaded zip file.
- Enter a name for the local update site (e.g., "Android Plugin") in the "Name" field.
- ClickOK.
- Follow the remaining procedures as listed fordefault installationabove, starting from
step 4.
To update your plugin once you've installed using the zip file, you will have to follow these steps again instead of the default update instructions.
Other install errors
Note that there are features of ADT that require some optional Eclipse packages (for example, WST). If you encounter an error when installing ADT, your Eclipse installion might not include these packages. For information
about how to quickly add the necessary packages to your Eclipse installation, see the troubleshooting topicADT
Installation Error: "requires plug-in org.eclipse.wst.sse.ui".
For Linux users
If you encounter this error when installing the ADT Plugin for Eclipse:
An error occurred during provisioning.
Cannot connect to keystore.
JKS
...then your development machine lacks a suitable Java VM. Installing Sun Java 6 will resolve this issue and you can then reinstall the ADT Plugin.
_____________________________________________________________________________________________________________
1、启动Eclipse,选择菜单Help->Install New Software..


next
next
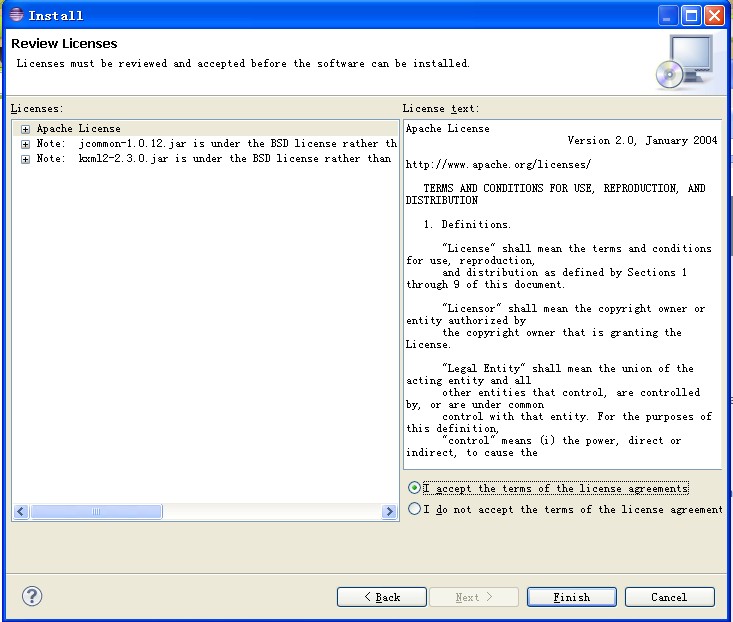
accept the terms.Finish
安装过程中,出现如下警告,点击【OK】即可。
安装完毕,提示重新启动Eclipse。

配置 ADT Plugin
安装 ADT 并重启 Eclipse后, 需指定 Android SDK目录位置:
- 选择Window>Preferences...t打开偏好面板(Preferences panel) (on Mac OS X, selectEclipse>Preferences).
- 在左侧面板选择Android.
看到对话框询问是否 发送使用统计信息给Google. 是的话, make your choice and clickProceed.
- 对SDK Location主面板, 单击Browse...定位Android SDK 目录 (such as
android-sdk-windows).
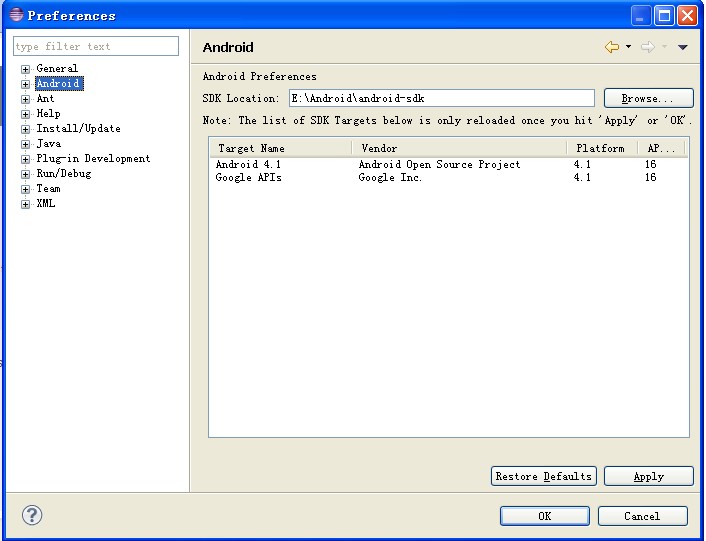
单击应用Apply, 然后点击OK.
I若没有遇到错误, 就完成了ADT设置,可以继续SDK安装的下一步。
步骤四:创建虚拟机
Android模拟器运行环境配置——新建AVD(android vitural device)和SD card
创建sdcard
进入android sdk\tools目录,运行mksdcard
在eclipse中安装了android环境后,可以直接创建AVD和sdcard的,windows->Android SDK and AVD Manager,创建一个AVD时,可以同时创建sdcard等。以下主要讲用命令行的方式创建这些东东。
一、 创建AVD
1.首先配置好环境变量,在path中加入模拟器路径,如D:/android-sdk_r06-windows/android-sdk-windows/tools;
2.然后打开命令行(快捷键Win+R),输入cmd;
3.列出所有的平台:android list target或者android list targets
4.创建AVD:android create avd–-name <your avd name> --target <targetID>其中your
avd name是你自己AVD的名字,targetID是前面列出的平台id
或者android create avd –-n <your avd name> -t <targetID> (注意未简写时前面是--);
5.查看AVD是否创建成功:命令:android list avd
6.启动模拟器:命令:emulator -avd(your avd name)
二、创建sdcard
1. mksdcard1024M D:/android/sdcard.img 第一个参数为创建的sdcard的大小,第二个参数为sdcard的路径及名字,建议以img为后缀。(注意路径中不能有空格出现)创建sdcard可能需要30秒左右,请耐心等待;
2. 导入刚创建好的SD卡到模拟器中:emulator -avd<your avd name> -sdcard D:/android/sdcard.img;导入好后模拟器会自动启动;
3. 在eclipse中可以查看sdcard中的信息,windows->show views-other-File explorer。
————————————————————————————————————————
打开Eclipse->AVD Manager


Create AVD
在建立sdcard.img的基础上,可以在创建AVD同时创建SD card


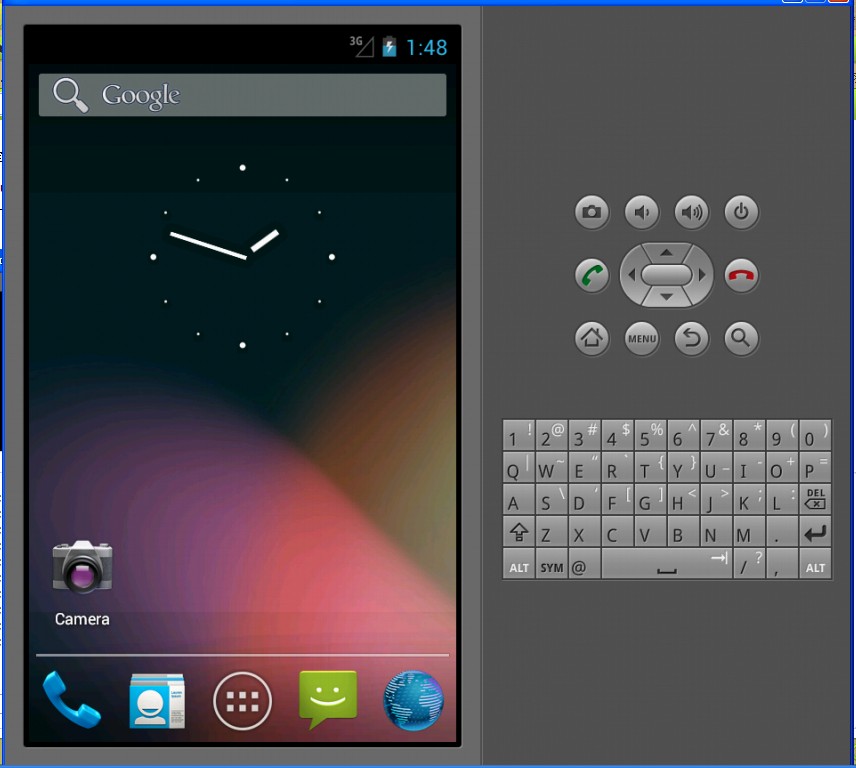
虚拟机创建完毕。
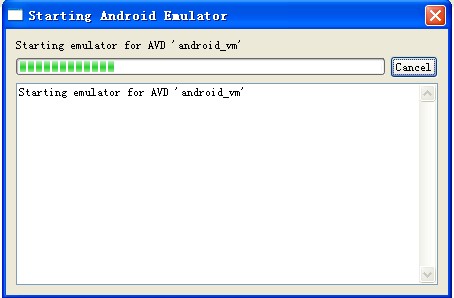
步骤五:启动虚拟机
AVD manager选择AVD,单击start

选择Launch启动虚拟机。
C盘容量已经满了,如下图,怎么办?

删除C盘多余的内容,使剩余容量大于512M。
————————————————————————————————————————————————————————
修改AVD路径
第一次使用 Android 的 SDK 时,可能有很多人纳闷如何修改 AVD 的位置,那么经过我的摸索和 Google 之,也经过实验,终于知道如何更改 AVD 的位置了,那么请看。
第一种方法,适合还没有建立 AVD 的情况
即:在计算机右击的属性|高级|环境变量,然后添加一个用户变量,名字为 "ANDROID_SDK_HOME”,然后把变量值改为你想将".android”文件夹(AVD信息)所放置的位置这样,你重新打开你的 SDK,看看存放的位置是不是变了?好了,那接下来第二种了。

第二种方法,适合在已经建立过AVD的情况
即: 修改配置文件中的路径,比如我的 AVD 名称是 Android,打开 C:\Documents and Settings\Administrator\.android\avd 目录中的文件 Android.ini 文件,找到
target=android-5path=C:\Documents and Settings\Administrator\.android\avd\MyAVD.avd (注意 Vista 和 W 7 这个路径在 C 盘你的用户名文件件中)修改其路径即可
注意:
1. AVD 路径中一定不能有中文,其他文不知道,但最好是英文,不然就出错。
2.若遇到ERROR: unknown virtual device name 这样的问题一般是由于AVD文件路径引用错误造成的。
————————————————————————————————————————————————————————————————————

以上,Android虚拟运行环境配置完毕。接着就可以进行Android开发了。
分享到:


相关推荐
搭建Android开发环境(SDK4.1最新最详细版) 全部GIF图例,保证你在网上尚可的情况下,一小时内搭建。
android4.1sdk 16android4.1sdk 16android4.1sdk 16android4.1sdk 16android4.1sdk 16
赠送jar包:android-4.1.1.4.jar; 赠送原API文档:android-4.1.1.4-javadoc.jar; 赠送源代码:android-4.1.1.4-sources.jar; 赠送Maven依赖信息文件:android-4.1.1.4.pom; 包含翻译后的API文档:android-4.1....
android4.1源码,学习的利器!
android4.1 sdk platform
android 4.1 SDK虚拟器安装教程
CHECKPOINT 4.1安装配置手册
android 4.1 关联eclipse作为源码查询用的源代码
最新Android SDK (4.1): 下载安装顺序: 首先下载安装 【Android 4.1 SDK Tools 20.0.1】 http://download.csdn.net/detail/joe9i0/4462908 然后下载以下包解压到SDK Tools的安装目录 【ARM EABI v7a System ...
第2章 工欲善其事 必先利其器——搭建Android开发环境 2.1 开发Android应用前的准备 2.1.1 Android开发系统要求 2.1.2 Android软件开发包 2.1.3 其他注意事项 2.2 Windows开发环境搭建 2.2.1 JDK、Eclipse、Android...
最新Android SDK (4.1): 下载安装顺序: 首先下载安装 【Android 4.1 SDK Tools 20.0.1】 http://download.csdn.net/detail/joe9i0/4462908 然后下载以下包解压到SDK Tools的安装目录 【ARM EABI v7a System ...
android 4.1 launcher2 源码 eclipse可以编译 联系我可以提供技术支持.
最新Android SDK (4.1): 下载安装顺序: 首先下载安装 【Android 4.1 SDK Tools 20.0.1】 http://download.csdn.net/detail/joe9i0/4462908 然后下载以下包解压到SDK Tools的安装目录 ...
Unzip this file and you would get gradle-4.1-all.zip Put to your_gradle_path\wrapper\dists\gradle-4.1-all\xxxxxxxx
最新Android SDK (4.1): 下载安装顺序: 首先下载安装 【Android 4.1 SDK Tools 20.0.1】 http://download.csdn.net/detail/joe9i0/4462908 然后下载以下包解压到SDK Tools的安装目录 【ARM EABI v7a System ...
android 4.1 最新SDK Windows版: http://s1.eoeandroid.com/sdk/4.1/android-sdk_r20-windows.zip(推荐) http://s1.eoeandroid.com/sdk/4.1/installer_r20-windows.exe Mac版: ...
android 4.1 opengl 源码
FWSM4.1官方配置手册,很详细,很强大,赶紧来下吧
这是android4.1里编译过的framework层的jar包。 可在安卓的laucher或者其他系统源码中使用。