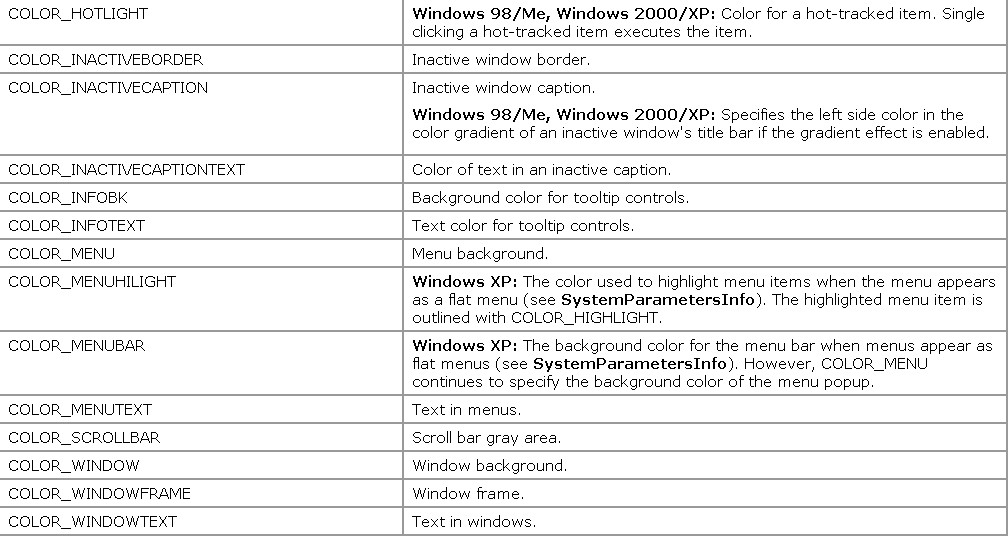
Windows有29种系统颜色,每种颜色都在0-255之间,它使用GetSysColor和SetSysColors来调用颜色参数:
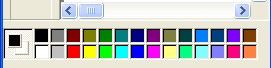
也就是Windows下的画板的颜色:
罗列一下具体的29种颜色的参数:

如下调用:
SetBkColor(hdc,GetSysColor(COLOR_BTNFACE));
SetTextColor(hdc,GetSysColor(Color_WINDOWTEXT));
//更改了系统颜色,要用下面的语句传递消息
case WM_SYSCOLORCHANGE:
    InvalidateRect(hwnd,NULL,TRUE);
    break;
一般使用获取WM_CTLCOLORSTATIC:消息去改变颜色:
下面看一段自绘按钮的代码:
#include<windows.h>
#include<windowsx.h>

#define ID_SMALLER 1
#define ID_LARGER 2
#define BTN_WIDTH (8*cxChar)
#define BTN_HEIGHT  (4*cyChar)

LRESULT CALLBACK WindowProc(
  HWND hwnd,      // handle to window
  UINT uMsg,      // message identifier
  WPARAM wParam,  // first message parameter
  LPARAM lParam   // second message parameter
);

HINSTANCE hInst;
int WINAPI WinMain(
  HINSTANCE hInstance,      // handle to current instance
  HINSTANCE hPrevInstance,  // handle to previous instance
  LPSTR lpCmdLine,          // command line
  int nCmdShow              // show state
)
{
	static TCHAR szAppName[]=TEXT("leidemingzi");
	HWND hwnd;
	MSG msg;
	WNDCLASS wndclass;

	hInst=hInstance;
	wndclass.cbClsExtra=0;
	wndclass.cbWndExtra=0;
	wndclass.hbrBackground=(HBRUSH)GetStockObject(WHITE_BRUSH);
	wndclass.hCursor=LoadCursor(NULL,IDC_ARROW);
	wndclass.hIcon=LoadIcon(NULL,IDI_ERROR);
	wndclass.hInstance=hInstance;
	wndclass.lpfnWndProc=WindowProc;
	wndclass.lpszClassName=szAppName;
	wndclass.lpszMenuName=NULL;
	wndclass.style=CS_HREDRAW|CS_VREDRAW;

	if(!RegisterClass(&wndclass))
	{
		MessageBox(NULL,TEXT("the program requrie the window nt"),TEXT("tips"),MB_ICONERROR);
		return 0;
	}

	hwnd=CreateWindow(
	  szAppName,  // registered class name
	  TEXT("this is title"), // window name
	  WS_OVERLAPPEDWINDOW,        // window style
	  CW_USEDEFAULT,                // horizontal position of window
	  CW_USEDEFAULT,                // vertical position of window
	  CW_USEDEFAULT,           // window width
	 CW_USEDEFAULT,          // window height
	  NULL,      // handle to parent or owner window
	  NULL,          // menu handle or child identifier
	  hInstance,  // handle to application instance
	  NULL        // window-creation data
);

	ShowWindow(hwnd,nCmdShow);
	UpdateWindow(hwnd);

	while(GetMessage(&msg,NULL,0,0))
	{
		TranslateMessage(&msg);
		DispatchMessage(&msg);
	}

	return msg.wParam;
}

void Triangle(HDC hdc,POINT pt[])
{
	SelectObject(hdc,GetStockObject(BLACK_BRUSH));
	Polygon(hdc,pt,3);
	SelectObject(hdc,GetStockObject(WHITE_BRUSH));
}

LRESULT CALLBACK WindowProc(
  HWND hwnd,      // handle to window
  UINT uMsg,      // message identifier
  WPARAM wParam,  // first message parameter
  LPARAM lParam   // second message parameter
)
{
	static HWND hwndSmaller,hwndLarger;
	static int cxClient,cyClient,cxChar,cyChar;
	LPDRAWITEMSTRUCT pdis;
	POINT pt[3];
	int cx,cy;
	RECT rect;

	switch(uMsg)
	{
	case WM_CREATE:
		cxChar=LOWORD(GetDialogBaseUnits());
		cyChar=HIWORD(GetDialogBaseUnits());

		hwndSmaller=CreateWindow(
				TEXT("button"),TEXT(""),
				WS_CHILD|WS_VISIBLE|BS_OWNERDRAW,
				0,0,BTN_WIDTH,BTN_HEIGHT,hwnd,
				(HMENU)ID_SMALLER,hInst,NULL
			);

		hwndLarger=CreateWindow(
				TEXT("button"),TEXT(""),
				WS_CHILD|WS_VISIBLE|BS_OWNERDRAW,0,0,
				BTN_WIDTH,BTN_HEIGHT,
				hwnd,(HMENU)ID_LARGER,hInst,NULL
			);
		return 0;

	case WM_SIZE:
		cxClient=GET_X_LPARAM(lParam);
		cyClient=GET_Y_LPARAM(lParam);

		MoveWindow(hwndSmaller,cxClient/2-3*BTN_WIDTH/2,cyClient/2-BTN_HEIGHT/2,BTN_WIDTH,BTN_HEIGHT,TRUE);
		MoveWindow(hwndLarger,cxClient/2+BTN_WIDTH/2,cyClient/2-BTN_HEIGHT/2,BTN_WIDTH,BTN_HEIGHT,TRUE);

		return 0;

	case WM_COMMAND:
		GetWindowRect(hwnd,&rect);

		switch(wParam)
		{
		case ID_SMALLER:
			rect.left+=cxClient/20;
			rect.right-=cxClient/20;
			rect.top+=cyClient/20;
			rect.right-=cyClient/20;
			break;

		case ID_LARGER:
			rect.left-=cxClient/20;
			rect.right+=cxClient/20;
			rect.top-=cyClient/20;
			rect.right+=cyClient/20;
			break;
		}

		MoveWindow(hwnd,rect.left,rect.top,rect.right-rect.left,rect.bottom-rect.top,TRUE);

		return 0;

	case WM_DRAWITEM:
		pdis=(LPDRAWITEMSTRUCT)lParam;

		FillRect(pdis->hDC,&pdis->rcItem,(HBRUSH)GetStockObject(WHITE_BRUSH));

		FrameRect(pdis->hDC,&pdis->rcItem,(HBRUSH)GetStockObject(BLACK_BRUSH));

		cx=pdis->rcItem.right-pdis->rcItem.left;
		cy=pdis->rcItem.bottom-pdis->rcItem.top;

		switch (pdis->CtlID)
          {
          case ID_SMALLER :
               pt[0].x = 3 * cx / 8 ;  pt[0].y = 1 * cy / 8 ;
               pt[1].x = 5 * cx / 8 ;  pt[1].y = 1 * cy / 8 ;
               pt[2].x = 4 * cx / 8 ;  pt[2].y = 3 * cy / 8 ;

               Triangle (pdis->hDC, pt) ;

               pt[0].x = 7 * cx / 8 ;  pt[0].y = 3 * cy / 8 ;
               pt[1].x = 7 * cx / 8 ;  pt[1].y = 5 * cy / 8 ;
               pt[2].x = 5 * cx / 8 ;  pt[2].y = 4 * cy / 8 ;

               Triangle (pdis->hDC, pt) ;

               pt[0].x = 5 * cx / 8 ;  pt[0].y = 7 * cy / 8 ;
               pt[1].x = 3 * cx / 8 ;  pt[1].y = 7 * cy / 8 ;
               pt[2].x = 4 * cx / 8 ;  pt[2].y = 5 * cy / 8 ;

               Triangle (pdis->hDC, pt) ;

               pt[0].x = 1 * cx / 8 ;  pt[0].y = 5 * cy / 8 ;
               pt[1].x = 1 * cx / 8 ;  pt[1].y = 3 * cy / 8 ;
               pt[2].x = 3 * cx / 8 ;  pt[2].y = 4 * cy / 8 ;

               Triangle (pdis->hDC, pt) ;
               break ;

          case ID_LARGER :
               pt[0].x = 5 * cx / 8 ;  pt[0].y = 3 * cy / 8 ;
               pt[1].x = 3 * cx / 8 ;  pt[1].y = 3 * cy / 8 ;
               pt[2].x = 4 * cx / 8 ;  pt[2].y = 1 * cy / 8 ;

               Triangle (pdis->hDC, pt) ;

               pt[0].x = 5 * cx / 8 ;  pt[0].y = 5 * cy / 8 ;
               pt[1].x = 5 * cx / 8 ;  pt[1].y = 3 * cy / 8 ;
               pt[2].x = 7 * cx / 8 ;  pt[2].y = 4 * cy / 8 ;

               Triangle (pdis->hDC, pt) ;

               pt[0].x = 3 * cx / 8 ;  pt[0].y = 5 * cy / 8 ;
               pt[1].x = 5 * cx / 8 ;  pt[1].y = 5 * cy / 8 ;
               pt[2].x = 4 * cx / 8 ;  pt[2].y = 7 * cy / 8 ;

               Triangle (pdis->hDC, pt) ;

               pt[0].x = 3 * cx / 8 ;  pt[0].y = 3 * cy / 8 ;
               pt[1].x = 3 * cx / 8 ;  pt[1].y = 5 * cy / 8 ;
               pt[2].x = 1 * cx / 8 ;  pt[2].y = 4 * cy / 8 ;

               Triangle (pdis->hDC, pt) ;
               break ;
          }

		if(pdis->itemState*ODS_SELECTED)
			InvertRect(pdis->hDC,&pdis->rcItem);

		if(pdis->itemState&ODS_FOCUS)
		{
			pdis->rcItem.left+=cx/16;
			pdis->rcItem.top+=cy/16;
			pdis->rcItem.right-=cx/16;
			pdis->rcItem.bottom-=cy/16;

			DrawFocusRect(pdis->hDC,&pdis->rcItem);
		}
		return 0;

	case WM_DESTROY:
		PostQuitMessage(0);
		return 0;

	}
	return DefWindowProc(hwnd,uMsg,wParam,lParam);
}
其中,GetDialogBaseUnits()方法类似于TEXTMETRIC的tmAveCharWidth属性
case WM_DRAWITEM在绘制OWNERDRAW控件生效
再看一下DRAWITEMSTRUCT的定义,详细请看MSDN
typedef struct tagDRAWITEMSTRUCT {
  UINT      CtlType;
  UINT      CtlID;
  UINT      itemID;
  UINT      itemAction;
  UINT      itemState;
  HWND      hwndItem;
  HDC       hDC;
  RECT      rcItem;
  ULONG_PTR itemData;
} DRAWITEMSTRUCT
效果图如下:

选中的时候,按钮颜色取反,左边按钮使窗体变小,右边按钮使窗体变大
忠告:
对于使用自绘按钮的人,Windows会为你获得设备环境,并把它放在DRAWITEMSTRUCT结构的一个字段中,必须原样不动保持这个设备的状态,任何一个被选入该设备环境的GDI对象必须设置回原有的不被选中的状态,此外不能在按钮的区域以外绘制任何图形。
分享到:


相关推荐
自绘按钮控件 自绘按钮控件 自绘按钮控件 自绘按钮控件
vc++自绘按钮控件,自定义按钮的外观.zip visual c++制作自定义按钮
VC++自绘窗口, 自绘控件,自绘边框,高速绘图不闪烁, 窗口可以拉伸改变大小, 标题栏也可以双击最大化或最小化
本例程主要包含MFC较为常用的一些控件的自绘继承类,自绘全都为自定义类,直接调用即可。都是些较为简单的自绘,可供初学者学习。
用 Win API 实现自绘按钮类用 Win API 实现自绘按钮类
qt的子窗口控件使用实例,运行环境是QT5,供大家参考使用
自绘List控件自绘List控件自绘List控件自绘List控件自绘List控件自绘List控件自绘List控件自绘List控件自绘List控件
visual c++对BUTTON按钮换肤 自绘按钮控件
该程序可遍历当前打开的所有窗口,以及每个窗口的子控件,显示出窗口名字,子控件名字及类型,使用VC++开发
在MFC中,无句柄控件自绘之图像按钮,绘制图像按钮
c# winform 下控件的自绘,这里只简单介绍按钮和label的自绘功能,其余的请自己参考
里面有CButtonST类,以及自绘按钮控件的例子
实现EDIT控件自绘 实现EDIT控件自绘 实现EDIT控件自绘实现EDIT控件自绘
asm_09子窗口控件
自绘的按钮附带源码 自绘的按钮附带源码 自绘的按钮附带源码
C#中父窗口和子窗口之间实现控件互操作C#中父窗口和子窗口之间实现控件互操作
有时编写界面的时候,当遇到在按钮控件上怎么自绘按钮的实现
自绘按钮控件,对一些界面要求比较高的公司,他会考查这方面的内容
c#编程的时候,有时候会用到在当前窗口里面修改了一些参数的时候,希望另外一个窗口控件属性得到刷新更改. 本程序通过简单的代码,实现了此功能,希望能使更多和我一样的C#编程爱好者更好地学会学好C#. 如果您有好的...