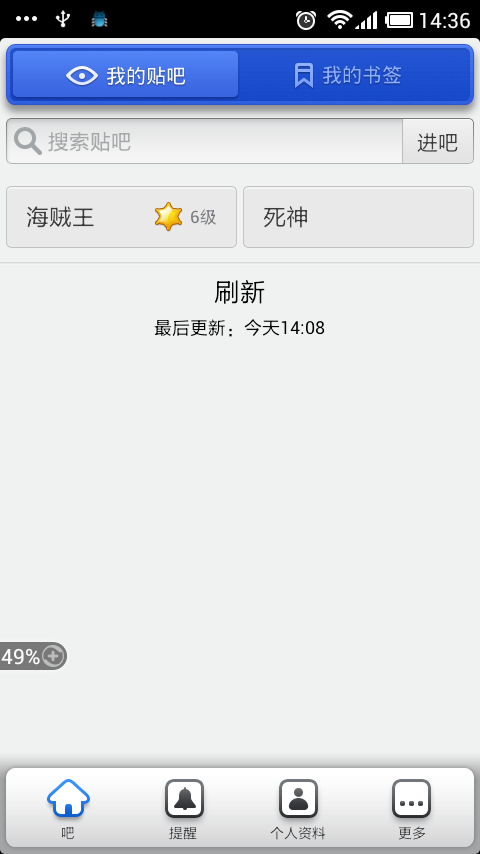
还记得几个月前刚接触“百度贴吧”这款应用时,瞬间就被它的悬浮式标题栏以及标签栏所吸引,虽然当时身边有个UI的MM说悬浮式一般都是具备隐藏的功能时才设计成这样的,一般情况下还是用直通式的好,在这里我也不讨论孰优孰劣,截取两个图,大家自己品味下。
悬浮式标题栏和标签栏:(百度贴吧);直通式标题栏和标签栏:(QQ空间)

本文的目的就是研究下百度贴吧的这个标题栏和标签栏的实现原理;
1、 悬浮式标题栏的实现
实现原理有两种:1)在布局文件中设置标题栏的layout_margin属性;2)给标题栏设置一个9-patch格式的background图片,在这种图片上设置上下左右的空白间隔,如下图所示,背景图片的top、left和right分别有一个像素的空白,bottom则是两个像素。

使用第二种方式实现的标题栏的布局文件如下:
<!-- 标题栏 -->
    <LinearLayout
        android:id="@+id/home_layout_bar"
        android:layout_width="fill_parent"
        android:layout_height="wrap_content"
        android:layout_alignParentTop="true"
        android:layout_gravity="top"
        android:background="@drawable/title_bg"
        android:gravity="center" >

        <LinearLayout
            android:layout_width="fill_parent"
            android:layout_height="wrap_content"
            android:background="@drawable/home_topbar_bg"
            android:gravity="center"
            android:orientation="horizontal" >

            <!-- 我的贴吧 -->
            <ImageButton
                android:id="@+id/home_bt_like"
                android:layout_width="fill_parent"
                android:layout_height="fill_parent"
                android:layout_gravity="center"
                android:layout_margin="0.0dip"
                android:layout_weight="1.0"
                android:background="@null"
                android:padding="0.0dip"
                android:paddingBottom="2.0dip"
                android:scaleType="center"
                android:src="@drawable/home_bt_like_on" />

            <!-- 我的标签 -->
            <ImageButton
                android:id="@+id/home_bt_mark"
                android:layout_width="fill_parent"
                android:layout_height="fill_parent"
                android:layout_gravity="center"
                android:layout_margin="0.0dip"
                android:layout_weight="1.0"
                android:background="@null"
                android:padding="0.0dip"
                android:paddingBottom="2.0dip"
                android:scaleType="center"
                android:src="@drawable/home_bt_mark" />
        </LinearLayout>
    </LinearLayout>
其中title_bg就是用来实现悬浮效果的9-patch背景图片,这里为了优化视觉上的效果,在背景图片上又加了一层图片,也就是home_topbar_bg,加与不加的对比效果如图:


我的贴吧和我的书签这两个按钮的按下与松开的是通过切换android:background和android:src的图片资源来实现的,而没有采用通常的selector方式,代码中设置按钮的单击响应函数,更换按钮图片资源的关键代码如下:
	mButtonLike.setBackgroundResource(R.drawable.home_topbar_bt);
	mButtonLike.setImageResource(R.drawable.home_bt_like_on);
	mButtonMark.setBackgroundDrawable(null);
	mButtonMark.setImageResource(R.drawable.home_bt_mark);
2、 悬浮式标签栏的实现
标签栏的实现有很多种组合,比较省事的是使用系统提供的TabHost+TabWidget,比较自由的是使用TabHost+RadioGroup,下面使用第二种方式。
标签栏悬浮效果同样是通过9-patch背景图片实现的,如下图:

标签栏的实现必须具备三个基本元素,如下图所示,分别是1)id为@android:id/tabhost的<TabHost>标签;2)id为@android:id/tabcontent的<FrameLayout>标签;3)id为@android:id/tabs的<TabWidget>标签。如下图所示:
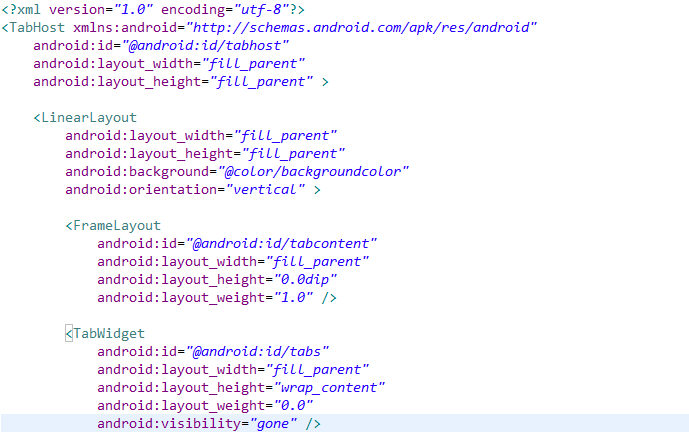
由于这里我们使用TabHost+RadioGroup的方式,也就是使用RadioGroup代替TabWidget,所以布局文件中TabWidget的可见性设置为gone,紧接上面布局的是RadioGroup的布局:
        <FrameLayout
            android:layout_width="fill_parent"
            android:layout_height="wrap_content"
            android:layout_gravity="bottom"
            android:layout_marginTop="-10.0dip"
            android:background="@drawable/maintab_toolbar_bg"
            android:paddingLeft="7.0dip"
            android:paddingRight="7.0dip" >

            <RadioGroup
                android:id="@+id/main_radio"
                android:layout_width="fill_parent"
                android:layout_height="wrap_content"
                android:gravity="center_vertical"
                android:orientation="horizontal" >

                <RadioButton
                    android:id="@+id/radio_home"
                    style="@style/main_tab_bottom"
                    android:drawableTop="@drawable/tabs_home"
                    android:text="@string/bar" />

                <RadioButton
                    android:id="@+id/radio_mention"
                    style="@style/main_tab_bottom"
                    android:drawableTop="@drawable/tabs_sort"
                    android:text="@string/remind" />

                <RadioButton
                    android:id="@+id/radio_person_info"
                    style="@style/main_tab_bottom"
                    android:drawableTop="@drawable/tabs_search"
                    android:text="@string/person_info" />

                <RadioButton
                    android:id="@+id/radio_more"
                    style="@style/main_tab_bottom"
                    android:drawableTop="@drawable/tabs_more"
                    android:text="@string/more" />
            </RadioGroup>

            <TextView
                android:id="@+id/message_mention"
                android:layout_width="wrap_content"
                android:layout_height="wrap_content"
                android:layout_gravity="top|left|center"
                android:layout_marginLeft="115.0dip"
                android:layout_marginTop="-5.0dip"
                android:background="@drawable/message_tips"
                android:gravity="center"
                android:text=""
                android:textColor="#ffffffff"
                android:textSize="13.0sp"
                android:visibility="visible" />

            <TextView
                android:id="@+id/message_person"
                android:layout_width="wrap_content"
                android:layout_height="wrap_content"
                android:layout_gravity="top|left|center"
                android:layout_marginLeft="190.0dip"
                android:layout_marginTop="-5.0dip"
                android:background="@drawable/message_tips"
                android:gravity="center"
                android:text=""
                android:textColor="#ffffffff"
                android:textSize="13.0sp"
                android:visibility="visible" />
        </FrameLayout>
其中
1) maintab_toolbar_bg 是标签栏的背景图,实现悬浮效果;
2) RadioButton中的
android:drawableTop="@drawable/tabs_sort"
android:text="@string/remind"
组合可以轻松实现图片上文字下的效果;
3) FrameLayout中的android:layout_marginTop="-10.0dip"实现标签栏与上方id为tabcontent的FrameLayout部分重叠的效果(10.0dip);
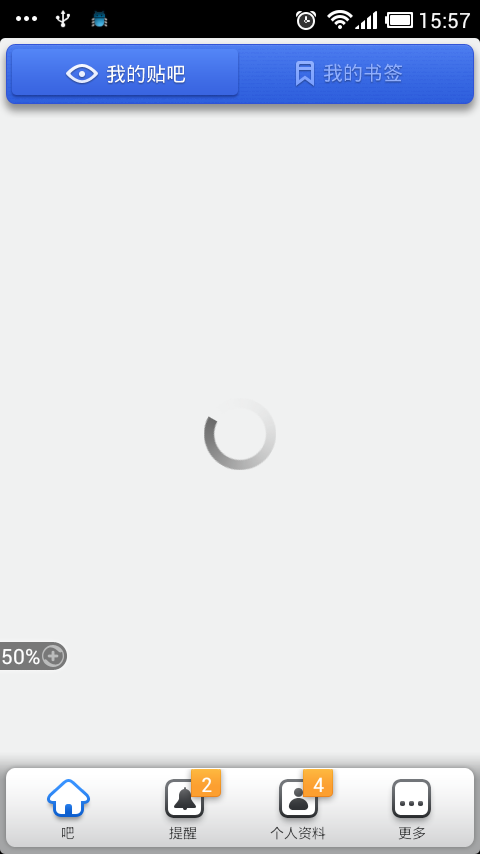
4)两个TextView和FrameLayout配合实现下图中标签右上角的消息个数提示功能

接下来就是代码如何实现标签的添加,标签的点击响应等等,直接看代码了:
package com.hust.iprai.wen;

import android.app.AlertDialog;
import android.app.TabActivity;
import android.content.DialogInterface;
import android.content.Intent;
import android.os.Bundle;
import android.view.KeyEvent;
import android.widget.CompoundButton;
import android.widget.RadioButton;
import android.widget.TabHost;
import android.widget.TextView;

public class TiebaActivity extends TabActivity implements
		CompoundButton.OnCheckedChangeListener {

	private static final String HOME_TAB = "home_tab";
	private static final String MENTION_TAB = "mention_tab";
	private static final String PERSON_TAB = "person_tab";
	private static final String MORE_TAB = "more_tab";

	private Intent mHomeIntent = null;
	private Intent mMentionIntent = null;
	private Intent mPersonIntent = null;
	private Intent mMoreIntent = null;

	private TabHost mTabHost = null;

	private TextView mMessageTipsMention = null;
	private TextView mMessageTipsPerson = null;

	@Override
	public void onCreate(Bundle savedInstanceState) {
		super.onCreate(savedInstanceState);
		setContentView(R.layout.maintabs_activity);

		mTabHost = getTabHost();
		initIntents();
		initTips();
		initRadios();
		setupIntents();
	}

	private void initIntents() {
		mHomeIntent = new Intent(this, HomeActivity.class);
		mMentionIntent = new Intent(this, MentionActivity.class);
		mPersonIntent = new Intent(this, PersonInfoActivity.class);
		mMoreIntent = new Intent(this, MoreActivity.class);
	}

	private void initTips() {
		mMessageTipsMention = (TextView) findViewById(R.id.message_mention);
		mMessageTipsPerson = (TextView) findViewById(R.id.message_person);
		mMessageTipsMention.setText("2");
		mMessageTipsPerson.setText("4");
	}

	private void initRadios() {
		((RadioButton) findViewById(R.id.radio_home))
				.setOnCheckedChangeListener(this);
		((RadioButton) findViewById(R.id.radio_mention))
				.setOnCheckedChangeListener(this);
		((RadioButton) findViewById(R.id.radio_person_info))
				.setOnCheckedChangeListener(this);
		((RadioButton) findViewById(R.id.radio_more))
				.setOnCheckedChangeListener(this);
	}

	private void setupIntents() {
		((RadioButton) findViewById(R.id.radio_home)).setChecked(true);
		mTabHost.addTab(buildTabSpec(HOME_TAB, mHomeIntent));
		mTabHost.addTab(buildTabSpec(MENTION_TAB, mMentionIntent));
		mTabHost.addTab(buildTabSpec(PERSON_TAB, mPersonIntent));
		mTabHost.addTab(buildTabSpec(MORE_TAB, mMoreIntent));
		mTabHost.setCurrentTabByTag(HOME_TAB);
	}

	private TabHost.TabSpec buildTabSpec(String tag, Intent intent) {
		TabHost.TabSpec tabSpec = mTabHost.newTabSpec(tag);
		tabSpec.setContent(intent).setIndicator("",
				getResources().getDrawable(R.drawable.icon));
		return tabSpec;
	}

	public void onCheckedChanged(CompoundButton buttonView, boolean isChecked) {
		if (isChecked) {
			switch (buttonView.getId()) {
			case R.id.radio_home:
				mTabHost.setCurrentTabByTag(HOME_TAB);
				break;
			case R.id.radio_mention:
				mTabHost.setCurrentTabByTag(MENTION_TAB);
				break;
			case R.id.radio_person_info:
				mTabHost.setCurrentTabByTag(PERSON_TAB);
				break;
			case R.id.radio_more:
				mTabHost.setCurrentTabByTag(MORE_TAB);
				break;
			default:
				break;
			}
		}
	}

	@Override
	public boolean dispatchKeyEvent(KeyEvent event) {
		if ((event.getAction() == KeyEvent.ACTION_DOWN)
				&& (event.getKeyCode() == KeyEvent.KEYCODE_BACK)) {
			quitDialog();
		}
		return super.dispatchKeyEvent(event);
	}

	private void quitDialog() {
		new AlertDialog.Builder(this)
				.setTitle(R.string.alerm_title)
				.setIcon(null)
				.setCancelable(false)
				.setMessage(R.string.alert_quit_confirm)
				.setPositiveButton(R.string.alert_yes_button,
						new DialogInterface.OnClickListener() {

							public void onClick(DialogInterface dialog,
									int which) {
								TiebaActivity.this.finish();
							}
						})
				.setNegativeButton(R.string.alert_no_button,
						new DialogInterface.OnClickListener() {

							public void onClick(DialogInterface dialog,
									int which) {
								dialog.dismiss();
							}
						}).create().show();
	}
}
3、中间加载进度条的实现
既然介绍了上边的标题栏,下边的标签栏,那么中间部分也得说一说,就以加载进度条为例,效果如下图所示:
“我的贴吧”按钮对应的activity是LikeActivity,它的布局文件如下。在FrameLayout中布局了ListView和ProgressBar,且ProgressBar位于ListView的上层。
<?xml version="1.0" encoding="utf-8"?>
<FrameLayout xmlns:android="http://schemas.android.com/apk/res/android"
    android:layout_width="fill_parent"
    android:layout_height="fill_parent" >

    <ListView
        android:id="@+id/home_lv_forum"
        android:layout_width="fill_parent"
        android:layout_height="wrap_content"
        android:background="@color/backgroundcolor"
        android:cacheColorHint="@color/backgroundcolor"
        android:divider="@drawable/list_divider"
        android:fadingEdge="none"
        android:listSelector="@drawable/list_selector" />

    <ProgressBar
        android:id="@+id/home_progress_like"
        style="?android:attr/progressBarStyleInverse"
        android:layout_width="wrap_content"
        android:layout_height="wrap_content"
        android:layout_gravity="center"
        android:indeterminateDrawable="@drawable/progressbar"
        android:visibility="visible" />

</FrameLayout>
其中,android:indeterminateDrawable="@drawable/progressbar"用于指定进度条的显示的图片,progressbar.xml定义如下:
<?xml version="1.0" encoding="utf-8"?>
<animated-rotate xmlns:android="http://schemas.android.com/apk/res/android"
    android:drawable="@drawable/loading"
    android:pivotX="50.0%"
android:pivotY="50.0%" />
即实现图片loading围绕自身中心旋转的效果。loading图片如下图所示:

框架源码下载地址:http://download.csdn.net/detail/ace1985/4472460
分享到:


相关推荐
博客地址:http://blog.csdn.net/ace1985/article/details/7824431
百度贴吧布局框架的研究与实现,自己的收藏!
模仿百度贴吧的布局,包括上下Tab,适合新手学习之用,gb编码
Android Android源码 贴吧 高仿的百度贴吧, 百度贴吧的高仿源码可以参考。
MyTitleBar源代码,在Android定义Tab选项卡,实现了仿百度贴吧中的悬浮顶部和底部的标题栏效果,项目中含:源码+效果图+项目结构图,很不错的Android界面设计效果,代码中ISIBLE:0的意思是可见的;INVISIBILITY:4 ...
《基于python爬虫对百度贴吧进行爬取的设计与实现.docx》万字、已降重、毕业论文、本科,目录如下,希望对你有所帮助: 第一章 前言 1.1 研究背景 1.2 研究目的 1.3 研究方法 第二章 爬虫原理与相关技术 2.1 Python...
实现百度贴吧看帖时的滑动返回效果和AutoCompleteTextView的使用。
看到百度贴吧里有个显示等级的动画条,觉得功能简单,适合像我这样的新手来进行模仿,发帖,赚分 代码的主要思路就是重新系统的View类,在里面实现动画效果
百度贴吧签到器
最近在一个项目中做到了表情这一块,就是一个简单的回复功能(含表情)。类似于百度贴吧回复楼层的样式,抽出来做一个demo
模仿android百度贴吧下拉更新 如有什么BUG 可以发邮箱给我
后面版本将集成仿百度搜索引擎 功能更加丰富。 支持多数据库 支持主流数据库(excel,access,sqlserver,mysql,oracle),满足用户不同需求。 集成了通行证系统 支持多个网站用同一个账号库,实现多站同步...
Android实现了仿百度贴吧的悬浮式顶部和底部标题栏的效果.zip,太多无法一一验证是否可用,程序如果跑不起来需要自调,部分代码功能进行参考学习。
百度贴吧电脑版是中文最大社区百度贴吧的客户端,手机版百度贴吧可以实现电脑网页浏览的大部分功能,支持帖子搜索和浏览,还有特权,签到多倍积分等。 百度贴吧电脑版特色内容 百度贴吧客户端---为兴趣而生! ...
百度贴吧的爬虫制作和糗百的爬虫制作原理基本相同,都是通过查看源码扣出关键数据,然后将其存储到本地txt文件。 项目内容: 用Python写的百度贴吧的网络爬虫。 使用方法: 新建一个BugBaidu.py文件,然后将代码...
可以将百度贴吧的连载帖子直接转化为txt格式的文本文档!
百度贴吧珍藏版
百度贴吧图片爬取百度贴吧图片爬取百度贴吧图片爬取百度贴吧图片爬取百度贴吧图片爬取
百度贴吧一键签到Python脚本,请使用python3运行,可放到服务器定时签到